
If an IV line organizer can’t lower risk, fit staff routines, and be cleaned the same way every time, I wouldn’t move it past pilot use.
Here’s the short version: I’d test the prototype in the exact care setting where it will be used, track a small set of clear metrics, train staff the same way, and make a plain go / revise / stop call at the end. That matters because poor infusion line handling was ranked #8 on ECRI’s Top 10 Health Tech Hazards for 2025, and one large study of 900,635 patients found an average total fall cost of $62,521.
If I were setting up this kind of pilot, I’d keep the focus on four questions:
- Does it lower harm risk?
- Does it fit normal care work?
- Can staff clean it fast and the same way each time?
- Will nurses, staff, and caregivers keep using it?
I’d also make sure the test covers the full process:
- define the exact problem first
- set baseline metrics before the pilot starts
- match the plan to hospital, infusion clinic, or home care
- clear safety, infection control, and oversight review
- map risks like tangles, dislodgement, falls, skin issues, and pump interference
- check material hold-up after 50 to 100 cleaning cycles
- run a small pilot with simple documentation
- train staff in 15 to 30 minutes
- review data and feedback side by side before deciding what happens next
Bottom line: I’d treat prototype testing as a care-use proof test, not a product demo. The goal is simple: show that the device works at the bedside, in clinics, and in homes without adding new problems.
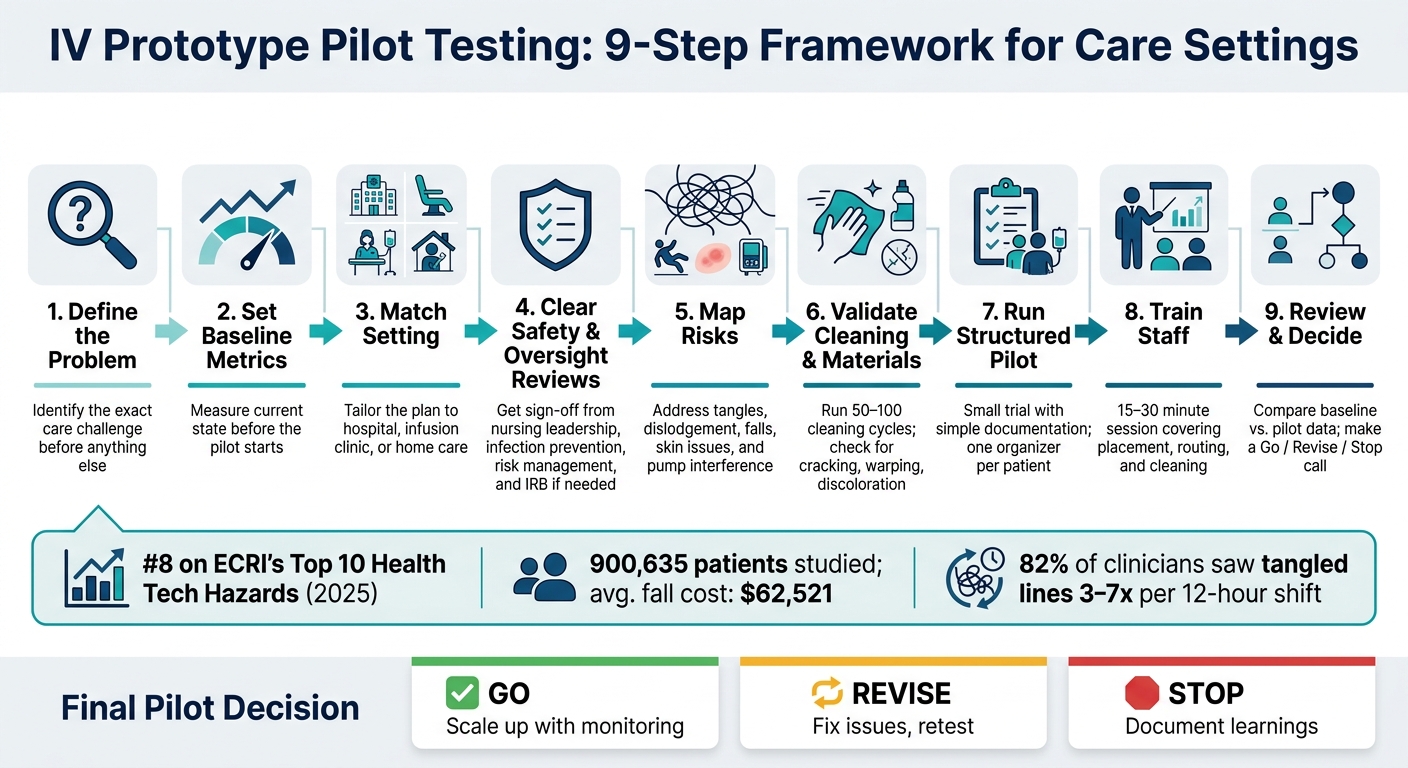
IV Prototype Pilot Testing: 9-Step Framework for Care Settings
Complete Safety, Infection Control, and Oversight Reviews Before the Trial
Treat safety, infection control, and oversight as the gate before any pilot trial. Before anything touches patient care, get sign-off from clinical nursing leadership, infection prevention, risk management, and, when needed, the facility's IRB or research office. If the organizer will sit near pumps, monitors, or power cords, bring in biomedical engineering or clinical engineering too.
Start by classifying the project as QI or human-subjects research. Then get written confirmation from the compliance or research office before moving ahead.
List Risks and Write Mitigation Steps
Before a prototype enters pilot use, map out every realistic way it could disrupt care or cause harm. Walk through the full IV workflow in each setting: line insertion, medication administration, patient ambulation, and emergency response. Then ask a simple question: where could this go sideways?
Talk with frontline staff early. A short tabletop simulation, where nurses and other users point out failure points during a busy shift, can reveal problems that a checklist might not catch.
These are the core hazards to address:
| Hazard | Likely Cause | Mitigation | Monitoring Method | Setting Relevance |
|---|---|---|---|---|
| Blocked IV port access | Organizer placed too close to hubs or clamps | Define required clearance zone; add placement diagrams to training | Spot audits of 10 patients per unit per week | High: hospital, clinic; Medium: home |
| Line mis-tracing | Multiple lines bundled without clear separation | Instruct staff to trace each line from patient to pump before use | Direct observation during pilot; log near-miss incidents | High: ICU, oncology, infusion centers |
| Fall or trip hazard | Organizer mounted low on bedrail or near floor | Require mounting above knee level; limit tubing slack in protocol | Track falls and near-falls in incident reporting system | High: med-surg, home care; Medium: clinic |
| Skin irritation | Device resting on fragile skin; pinch points or sharp edges | Prohibit direct skin contact; check skin each shift | Nursing skin checks documented once per shift | High: hospital, home; Medium: clinic |
| Pump or alarm interference | Organizer contacting pump buttons or occlusion sensors | Define minimum distance from devices; attach only to pole or bedrail | Visual checks during medication rounds; track alarm incidents | High: ICU, step-down; Medium: clinic |
| Inadequate cleaning between patients | Unclear instructions or incompatible cleaning agents | Provide written cleaning protocol with approved disinfectants and contact times | Environmental services (EVS) and nursing audits; visual checks on random samples | High: hospital, clinic; Medium: home |
Use these hazards to build the pilot checklist. Also, test rapid emergency removal before the trial starts. If staff can't remove the device and reach every line fast during a code, the placement protocol needs work before the pilot begins.
Confirm Cleaning, Reuse, and Material Compatibility
Cleaning validation is not optional, even in a short pilot. Classify the prototype by patient-contact level. If it touches only intact skin, treat it as noncritical and use low- to intermediate-level disinfection.
Before patient use, put the prototype through 50 to 100 cleaning cycles with facility-approved disinfectant wipes. After that, inspect it for:
- Cracking
- Discoloration
- Warping
- Label loss
The Beata Clasp, for example, is made from a latex-free, antimicrobial styrenic thermoplastic elastomer (TES) material. That supports compatibility with standard sanitizing wipes. Do not autoclave.
For reuse, single-patient use is the recommended workflow for prototype trials. If multi-patient reuse is required, spell out who cleans the device, when it gets cleaned, where that happens, and which product staff must use before the first patient encounter. And one more point: antimicrobial surfaces can help, but they do not replace disinfection.
With approvals, risk controls, and cleaning rules in place, move to the pilot design.
Design a Small, Structured Pilot Trial
With safety reviews and cleaning protocols locked in, the next move is to set up a pilot that fits normal day-to-day care and gives you data you can actually use. Keep it tight. Be clear about what success means. And make documentation simple enough that frontline staff can do it without feeling like they’ve been handed extra busywork.
Choose Participants, Settings, and Trial Size
Start with patients who are most likely to run into line management issues: adults with two or more active IV lines, patients on continuous infusions, or anyone who needs to walk with an IV pole. That focus makes sense. Surveys and interviews with about 780 clinicians at UCLA Health found that 82% had witnessed tangled medical lines three to seven times during a single 12-hour shift, and 77% had seen lines pulled out due to tangling or catching on equipment. Those are exactly the situations a pilot should focus on.
From there, set the smallest patient group and care setting mix that can still tell you if the prototype is doing its job. The goal isn’t to run a huge trial. It’s to get a clear signal. Match the number of devices to the size of the pilot so you have enough for the full unit, clinic, or home-care caseload during the trial period, without piling up extra stock that won’t get used.
Use one organizer per patient for the full visit or care episode. That way, the device stays with the patient during room transfers or trips to imaging.
Track Safety, Workflow, and Usability Outcomes
Track the outcomes that matter in daily care:
- Falls and near-misses
- Line dislodgement
- Tangled lines
- Contamination concerns
- Setup time
- Staff usability feedback
For workflow, keep the documentation light. Have staff group setup time into three buckets: ≤2 minutes, 3–5 minutes, or >5 minutes on first placement. For line tracing, a simple response set - faster, same, or slower than usual - is enough to show whether the device helps without making the form a pain to fill out. That matters because each line dislodgement event can take 6 to 30 minutes of staff time to fix, so even a small drop can have a clear effect.
Use the same core endpoints across settings. The main thing that should change is how often staff check and record what they see. Here’s a practical setup for each care setting:
| Setting | Sample Scope | Monitoring Frequency | Key Endpoints | Documentation Method |
|---|---|---|---|---|
| Hospital (med-surg/ICU) | 1 unit; 20–30 patients with ≥2 IV lines | Once per shift (day/evening/night) | Falls/near-misses; line dislodgement; tangles; safety concerns; setup time; staff satisfaction | Pilot checklist attached to nursing flowsheet; incident reports flagged with pilot checkbox |
| Clinic (infusion center) | 30–40 visits involving multi-drug regimens | Once per visit | Tangled lines; safety concerns; time to trace lines; patient satisfaction | Short paper or electronic visit form; brief staff note |
| Home care | 3–5 patients receiving home IV therapy | Once per home appointment | Line organization during ambulation; dislodgement; caregiver confidence; safety concerns | Home-visit checklist; after-visit summary |
Staff should also rate usability on a 5-point scale and note the main issue in one short free-text field.
sbb-itb-f779e18
Train Staff and Set Consistent Observation Standards
Pilot data only means something if people use the device the same way each time. That’s why placement, routing, and cleaning need to be set before the first observation. Training isn’t a side task. It’s part of the pilot. The goal is simple: make results comparable across shifts, visits, and care settings.
Cover Placement, Line Routing, and Cleaning in a Short Training Session
A 15–30 minute training session covers the essentials. It can fit into a unit huddle, a shift in-service, or a home health team meeting without taking too much time away from care.
Move through four areas in order.
Start with placement. Attach the organizer at about patient shoulder height on the IV pole, on the same side as the primary insertion site. That setup keeps lines visible, easy to assess, and off the floor and bed rails. If a patient is walking or using mobility aids, show staff how to keep tubing out of the path and secure the device when needed.
Then cover line routing. All tubing should pass through the organizer before it reaches the patient. Keep slack to gentle curves, not tight coils. Staff should trace every line to its source before connecting or disconnecting any device. During the hands-on part of training, have staff trace each line from the catheter hub to the bag or pump. Treat this as a standard observation step for safe, repeatable use in day-to-day care.
Cleaning comes next. Staff need to know which facility-approved disinfectant works with the device material, how long the surface must stay visibly wet, and to follow the wipe or solution label. Clean the organizer at the start of each encounter, after contamination, after disconnection, and before transport. After cleaning, inspect it for cracks, residue buildup, or deformation. If the device shows damage, remove it from service. If the prototype is the Beata Clasp, note that it is antimicrobial, latex-free, easy to clean, and not autoclaved.
Close with a return demonstration. This is where you confirm proper placement, routing, tracing, and cleaning. Each nurse or caregiver should place the organizer, route at least two lines through it, trace each line to its source, and do a mock cleaning. Brief scenario-based practice with immediate feedback improves adherence to the workflow more than didactic instruction alone. It also helps to name at least one super-user per unit who can coach peers during the first few shifts and spot uneven use early.
Use Checklists for Each Shift, Visit, or Home Appointment
Keep the observation checklist to one page and mostly tick boxes. Staff should be able to finish it in under 2 minutes. Build it into the documentation they already use, whether that’s nursing flowsheets in the hospital, visit forms in the clinic, or home-visit summaries in home health.
Use the same one-page checklist for every observed use after training is complete. The table below lays out who is trained, what they check, how often they document, and where issues go.
| Role | Training Content | What They Check Each Shift/Visit | Documentation Frequency | Where Issues Are Reported |
|---|---|---|---|---|
| Bedside nurse (hospital) | Placement, line routing, tracing, cleaning, removal criteria | Organizer correctly placed; lines off the floor; lines traced before infusion; device cleaned; reported discomfort or pressure points | Once per shift | Unit incident reporting system and nurse manager |
| Clinic RN/MA | Use during infusions, routing in chairs, cleaning between patients | Lines organized; no trip hazards; device cleaned between patients | Each infusion appointment | Clinic quality log and charge nurse |
| Home health nurse | Use in home, caregiver education, cleaning at visits | Safe placement in home; lines off the floor; caregiver able to use device; device cleaned | Every home visit | Home care agency reporting channel and case manager |
These checks should line up with the safety and usability outcomes in the pilot plan. Report falls, contamination, or line loss in the incident system during the same shift. Minor usability issues should go into the pilot feedback form.
For home care, give caregivers a clear instruction: stop using the organizer and call the home infusion nurse or agency if it seems to be causing a problem.
Review Feedback, Decide on Next Steps, and Close the Pilot
At the end of the pilot, review both the recorded data and staff feedback. Measure the pilot against the same goals set at the start: fewer tangles, faster tracing, safer use, and easier cleaning.
Compare Results and Summarize What Changed
Start with the pilot data, then compare it with the baseline so the change is easy to see. A simple outcome table helps you present the results clearly and share them with clinical leadership.
| Metric | Baseline Result | Pilot Result | Interpretation |
|---|---|---|---|
| Line tangles per 100 patient days | - | - | - |
| Time to trace 3 lines (min) | - | - | - |
| Near-miss IV misconnection events | - | - | - |
| Falls where IV tubing contributed | - | - | - |
| Staff rating: easy or very easy to use | - | - | - |
| New issues, such as skin irritation | - | - | - |
Then bring in themes from post-shift surveys and huddle notes. Don’t leave useful comments buried in a long log. Group them into 3-4 themes, such as safety benefit, workflow friction, cleaning burden, or patient comfort.
For example, if most nurses report faster handoffs but night-shift staff note that cleaning around the device takes longer during busy periods, that belongs in your interpretation - not buried in a comment log.
Be plain about sample size. If the pilot is too small to support firm conclusions, say so. That protects the team and sets the right expectations for any follow-up work.
Decide: Go, Revise, or Stop
Use the same results to make a direct go, revise, or stop decision. Set the decision criteria before the review meeting. In many cases, those criteria should already have been agreed on at the start of the pilot with clinical leadership, frontline staff, and infection prevention. The three areas that matter most are safety benefit, workflow impact, and cleaning feasibility.
| Domain | Go | Revise (Modify & Retest) | Stop (End Project) |
|---|---|---|---|
| Safety | Clear reduction in tangles, near-misses, and tubing-related events; no new serious harms | Some improvement, but new minor issues or unclear impact in specific settings | No improvement or new significant risks emerge |
| Workflow | Line tracing and setup faster or equal; staff report smoother workflows | Mixed impact; improved in some tasks but added steps in others | Workflows slowed; increased errors or workarounds |
| Cleaning & Infection Control | Cleaning fits existing protocols; no infection-control concerns raised | Feasible but adds burden; infection control wants material or placement changes | Impractical or unsafe; concerns persist after mitigation attempts |
| Staff Feedback | Majority supportive; easy training uptake; minimal resistance | Divided views; strong support alongside strong concerns requiring design changes | Broad rejection or inability to integrate into practice |
| Patient Feedback | Patients feel safer and more comfortable; minimal complaints | Acceptance varies across subgroups (e.g., limited mobility, fragile skin) | Frequent discomfort or refusal to use |
If most domains point to Go, move into a phased scale-up and set a monitoring schedule. Quarterly checks on tangles, falls, and staff feedback help you spot drift before the gains fade.
If several domains fall into Revise, fix the highest-impact issues first. Then run a shorter follow-up pilot in the most representative setting before expanding.
If a critical domain - especially safety or infection control - lands in Stop, end the project and document what the team learned. That record can guide the next design round or a later project.
Close the pilot by sharing results in a unit huddle or team meeting, thanking staff for their input, and filing a short written report with the outcome table, decision rationale, and any open risks.
FAQs
How long should an IV prototype pilot run?
A 30-day pilot trial is a smart way to test a prototype like the Beata Clasp on your unit.
In practice, most clinical teams can make an informed decision within 1 to 2 weeks of day-to-day use. But a 30-day trial gives your team more time to gather feedback, see how it performs in routine care, and judge whether it works well for your facility.
Who should approve the pilot before patient use?
Before you start a Beata Clasp pilot, bring it to your unit manager or your unit-based council or committee for formal review and approval. That step matters. It helps make sure the pilot fits your facility’s safety protocols and day-to-day operating standards.
Once leadership or the internal committee signs off, your facility’s purchasing department can place the order for patient use.
What data matters most in a small pilot?
Focus on two areas: patient safety and operational efficiency.
Track incidents such as line dislodgements, entanglements, and tubing impingements. Also note how much caregiver time goes into managing lines or untangling them. That gives you a clear picture of whether the product reduces friction in day-to-day care or just shifts work from one task to another.
It also helps to gather feedback from both staff and patients. From staff, look at ease of use and overall satisfaction. From patients, ask about perceived safety, call light access, and overall comfort.
Taken together, these measures show how the product affects daily clinical practice.