
IV line awareness is a critical safety practice in healthcare. It focuses on proper management of IV therapy to prevent complications like infections, medication errors, and device failures. With over 200 million IV catheters used annually in the U.S., the stakes are high: IV-related issues can increase hospital stays, raise costs, and even elevate the risk of death.
Here’s how to simplify IV line safety:
- Trace every line: Follow tubing from the insertion site to the source during every interaction.
- Label clearly: Use standardized labels at key points to prevent mix-ups.
- Inspect regularly: Check IV sites for redness, swelling, or other warning signs.
- Follow protocols: Maintain strict hygiene, change dressings on schedule, and remove lines when no longer needed.
- Utilize tools: Devices like the Beata Clasp help keep lines organized and reduce risks.
Why it matters: Errors in IV therapy occur in 1 out of 5 doses and can lead to serious consequences. By implementing simple, consistent practices, healthcare teams can reduce complications, improve outcomes, and control costs.
How To Maintain An IV Line? - Nursing Knowledge Exchange
Basic Principles of IV Line Awareness
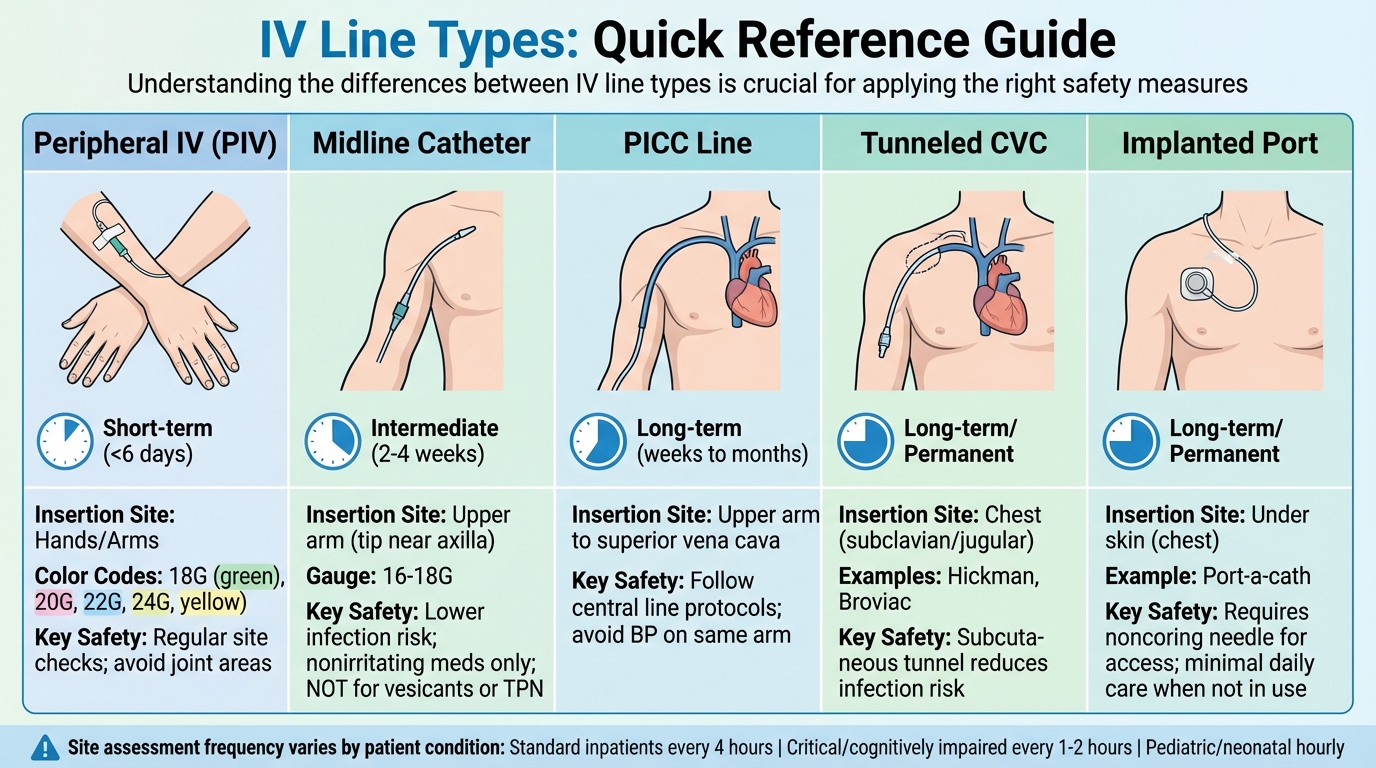
IV Line Types Comparison Chart: Duration, Insertion Sites, and Safety Requirements
An effective IV line awareness program starts with four key practices recommended by the CDC: practicing strict hand hygiene before every interaction with an IV line, maintaining aseptic technique during all procedures (like using a new sterile syringe and needle for each patient), reviewing the necessity of central lines daily, and removing catheters as soon as they are no longer needed. The Institute of Healthcare Improvement highlights that removing central lines promptly is one of the best ways to reduce complications - each additional day a line stays in increases the risk of infection.
Before administering medications, trace the IV tubing from the insertion site to the infusion bag to confirm you're accessing the correct port. This simple step helps prevent medication errors and tubing mix-ups. Regularly check the IV site for signs of complications like redness, swelling, tenderness, or coolness, which could indicate issues like infiltration or phlebitis.
"A safe injection does not harm the person, expose the provider to risks or result in hazardous waste for the community." – CDC
Additional precautions include scrubbing the hub, changing administration sets regularly, and replacing dressings on time. These practices are critical in preventing central line-associated bloodstream infections (CLABSIs), which are responsible for an estimated 33,000 deaths annually in the U.S.. These foundational steps are bolstered by daily safety protocols outlined below.
Core Safety Practices
Standard precautions form the backbone of patient care and are the CDC's baseline infection prevention standards. Always use aseptic technique, ensuring one needle and one syringe are used per patient when accessing an IV.
Daily assessment of central lines is essential. Healthcare teams should ask, "Does this patient still need this line?" If the answer is no, the line should be removed immediately. Central venous catheters significantly increase the risk of complications - including infections and blood clots - compared to peripheral IVs. A single CLABSI can extend a hospital stay by up to three weeks and add an average of $33,000 to the cost of care.
Proper dressing maintenance is equally important. Gauze dressings should be changed every two days, while transparent dressings can stay in place for up to seven days unless they become damp, loose, or soiled. In such cases, they should be replaced immediately. Tubing should also be replaced according to facility protocols, typically every 96 hours to seven days.
"Healthcare workers caring for a patient with a vascular access device should be trained, and assessed as competent, in using and consistently adhering to the infection prevention practices." – UK National Institute for Clinical Excellence
When administering secondary medications through "piggyback" setups, back priming can help prevent medication loss and ensure accurate dosing. For patients with contraindications for IV access in certain areas - such as those with a history of mastectomy, lymphedema, or fistulas - use clear signage or bracelets to alert staff.
Common IV Line Types
Knowing the differences between IV line types is crucial for applying the right safety measures and organizational strategies.
- Peripheral IVs (PIVs): Short-term catheters (less than six days) inserted in the hands or arms. These are often color-coded by gauge size: 18G (green), 20G (pink), 22G (blue), and 24G (yellow).
- Midline Catheters: Longer devices (16–18 gauge) inserted into the upper arm, with the tip near the axilla. These are used for therapy lasting 2–4 weeks, have a lower infection risk than central lines, and are suitable for nonirritating medications. They should not be used for vesicants or total parenteral nutrition.
- Peripherally Inserted Central Catheters (PICC Lines): Flexible tubes inserted into an upper arm vein, with the tip reaching the superior vena cava. Designed for long-term use (weeks to months), these require central line care. Blood pressure should not be taken on the arm with the PICC.
- Tunneled Central Venous Catheters (CVCs): Examples include Hickman and Broviac catheters. These are tunneled under the skin before entering the vein, creating a barrier that reduces infection risk.
- Implanted Ports: Surgically placed under the skin (e.g., Port-a-cath) for long-term venous access. These require minimal daily care when not in use but must be accessed with a noncoring needle.
| IV Line Type | Duration | Insertion Site | Key Safety Requirements |
|---|---|---|---|
| Peripheral IV | Short-term (<6 days) | Hands/Arms | Regular site checks; avoid joint areas |
| Midline Catheter | Intermediate (2–4 weeks) | Upper arm | Lower infection risk; nonirritating meds only |
| PICC Line | Long-term (weeks to months) | Upper arm to superior vena cava | Follow central line protocols; avoid BP on same arm |
| Tunneled CVC | Long-term/Permanent | Chest (subclavian/jugular) | Subcutaneous tunnel reduces infection risk |
| Implanted Port | Long-term/Permanent | Under skin (chest) | Requires noncoring needle for access |
The frequency of site assessments depends on the line type and patient condition. For standard inpatients, PIV sites should be checked at least every four hours. Critically ill or cognitively impaired patients require checks every 1–2 hours, while pediatric or neonatal patients need hourly monitoring. For saline locks not in continuous use, flushing with 5 mL of normal saline every 8–12 hours helps maintain patency.
With a solid understanding of IV line types, the next step is implementing line mapping to improve medication delivery accuracy.
What Is Line Mapping?
Line mapping involves systematically tracing and labeling IV lines from the infusion source (bag or pump) to the patient’s access site. Labels should be placed at critical points - near the infusion bag and at the port closest to the insertion site. This process ensures the correct medication is delivered through the correct route, reducing errors when managing multiple infusions.
"The label can be used as a technology to prevent misidentification of high-alert medications administered to critically ill patients through intravenous lines, thereby enhancing medication safety in healthcare institutions." – PubMed
High-alert medications like heparin and insulin are frequently involved in infusion errors. Using standardized labels - such as color codes or varying label sizes - helps staff quickly verify connections. Incorporating line mapping during bedside handoffs ensures continuity of care and allows for early error detection.
"The goal is to supply the correct medication to the correct patient at the correct time. Labels are a critical tool to capture and communicate this kind of information." – Caresfield
For medications with look-alike or sound-alike names, consider using Tall Man lettering (e.g., DOBUTamine vs. DOPAmine) on labels to minimize the risk of drug errors.
How to Implement a Line Awareness System
Building effective line awareness starts with clear protocols, consistent bedside practices, and structured handoffs. The goal is standardization: when every nurse follows the same steps, errors decrease, and patient care improves. These strategies align with core safety practices, making them easier to integrate into daily routines.
Develop a Standard Protocol
Creating a clear escalation protocol is a vital first step. This should outline who handles IV insertions and when to call for additional support. For example, at Sheikh Shakhbout Medical City (2023), they implemented a rule limiting floor nurses to two insertion attempts before escalating to Intensive Care Outreach Nurses. This approach led to a 68.8% first-attempt success rate and showed that 57.3% of consultations occurred outside regular hours. Such protocols establish a systematic approach to patient safety.
Incorporate automated pre-infusion checklists to evaluate vein quality, patient history, and medication type. Tools like the DIVA (Difficult Intravenous Access) scoring tool can be invaluable at the bedside. This tool assigns points based on vein visibility, palpability, and patient age. A score of 3 or higher flags high-risk patients who may need ultrasound-guided insertion or immediate specialist involvement. By integrating these assessments into the Electronic Medical Record (EMR), a patient’s difficult-access history can seamlessly follow them across shifts and hospital stays.
Additionally, standardize medication concentrations using guidelines like ASHP’s Standardize 4 Safety to minimize errors during transitions of care. Establish clear site selection policies and mandatory rotation schedules to reduce vein damage. When protocols are clear and incorporate technology, catheter patency rates improve by 22%, and infection rates drop by 17%.
Bedside Line Awareness Routine
Every shift should start with a bedside assessment that traces all IV tubing from the access site to the infusion source. This hands-on practice ensures tubing is correctly connected and that the right medication is flowing through the proper port. Before starting any new therapy, check for patency by aspirating for blood return and flushing with saline.
Inspect the insertion site for complications like redness, swelling, coolness, or tenderness. For standard inpatients, peripheral IV sites should be checked at least every four hours, while pediatric patients need hourly monitoring. The costs of premature peripheral IV catheter removal alone amount to $1.5 billion annually in the U.S..
Before accessing an IV line, scrub needleless connectors for five seconds. When setting up secondary infusions (piggybacks), use back-priming to fill the tubing with the primary solution. This prevents medication loss and reduces the risk of air embolisms. Label all IV bags immediately with the date and time of initiation, and place tubing labels near the drip chamber for quick identification during handoffs.
Include Line Awareness in Handoffs
After establishing protocols and routines, ensuring effective handoffs is crucial to maintaining patient safety. Communication breakdowns during shift changes account for over 80% of serious preventable adverse events in healthcare. To avoid this, conduct bedside handoffs, where both the outgoing and incoming nurses visually inspect all IV lines, sites, and equipment together. Use structured frameworks like SBAR (Situation, Background, Assessment, Recommendation) or I-PASS (Illness severity, Patient summary, Action list, Situation awareness, Synthesis) to ensure no critical infusion details are missed.
During the handoff, trace each line from the medication bag to the pump and then to the patient’s insertion site. Cross-check the IV pump’s infusion rates and concentrations with the Electronic Health Record (EHR) and active provider orders. Pay special attention to high-alert medications like vasopressors, heparin, and insulin to ensure these critical therapies are properly managed. The receiving nurse should summarize the infusion plan and address any uncertainties. This teach-back method ensures both nurses are on the same page.
A multi-institutional study involving nine pediatric academic hospitals in the U.S. demonstrated the impact of robust handoff practices. Implementing the I-PASS handoff bundle led to a 23% reduction in medical errors (from 24.5 to 18.8 per 100 admissions) and a 30% reduction in preventable adverse events (from 4.7 to 3.3 per 100 admissions).
"A 'don't be afraid to ask' culture is essential. Clarifying questions demonstrates your commitment to understanding the patient's condition and promoting better care."
– Kati Kleber, MSN RN
sbb-itb-f779e18
Tools and Strategies for Organizing IV Lines
Physical Organization Methods
Start by tracing the tubing from the patient to the source. At the bedside, it's essential to hang secondary infusion bags higher than primary ones. This ensures proper medication delivery and helps maintain venous access. For patients who are mobile or pediatric, you can wrap the IV site in gauze or use an arm board. This prevents tampering and keeps the tubing from getting obstructed during movement.
Using sutureless securement devices is another effective approach. These devices help reduce migration, dislodgement, and even phlebitis. Considering that IV failure rates in the U.S. can reach up to 53%, with infiltration rates exceeding 16% in some facilities, these tools are a game-changer. Securing the tubing directly to the patient’s arm adds an extra layer of protection against accidental pulling. Once the physical setup is in place, clear and accurate labeling becomes crucial to avoid errors.
Labeling and Color-Coding Systems
Labels should include key details like the drug name, concentration, dose, preparation time/date, expiration, and preparer’s initials. To minimize confusion, place labels at two points: near the top of the IV line and closer to the insertion site on the patient’s side. This is especially important because about 90% of hospitalized patients in the U.S. receive IV therapy, and a multisite study revealed that 60% of infusions had one or more errors. Nearly two-thirds of these errors were linked to improper labeling.
Color-coding adds another layer of safety by helping quickly identify drug classes. The American Society for Testing and Materials (ASTM) has designated nine specific colors for various drug types. For instance, Blue represents opioids, Violet is for vasopressors, Yellow indicates induction agents, and Fluorescent Red is used for neuromuscular blockers. At Hadassah University Medical Center in Jerusalem, adopting a color-coded labeling system for high-risk IV medications significantly improved error detection (p=0.03) and reduced the average time it took to perform tasks (p<0.0001). These clear and consistent labels work hand-in-hand with organized tubing to make line tracking more efficient.
"Color-coded labels add 'one more layer of cheese' to the defense against medication errors, which may be the difference between an uneventful case and an adverse event."
– Dr. Janik, Anesthesiologist, NorthShore University HealthSystem
Using Beata Clasp for Line Management
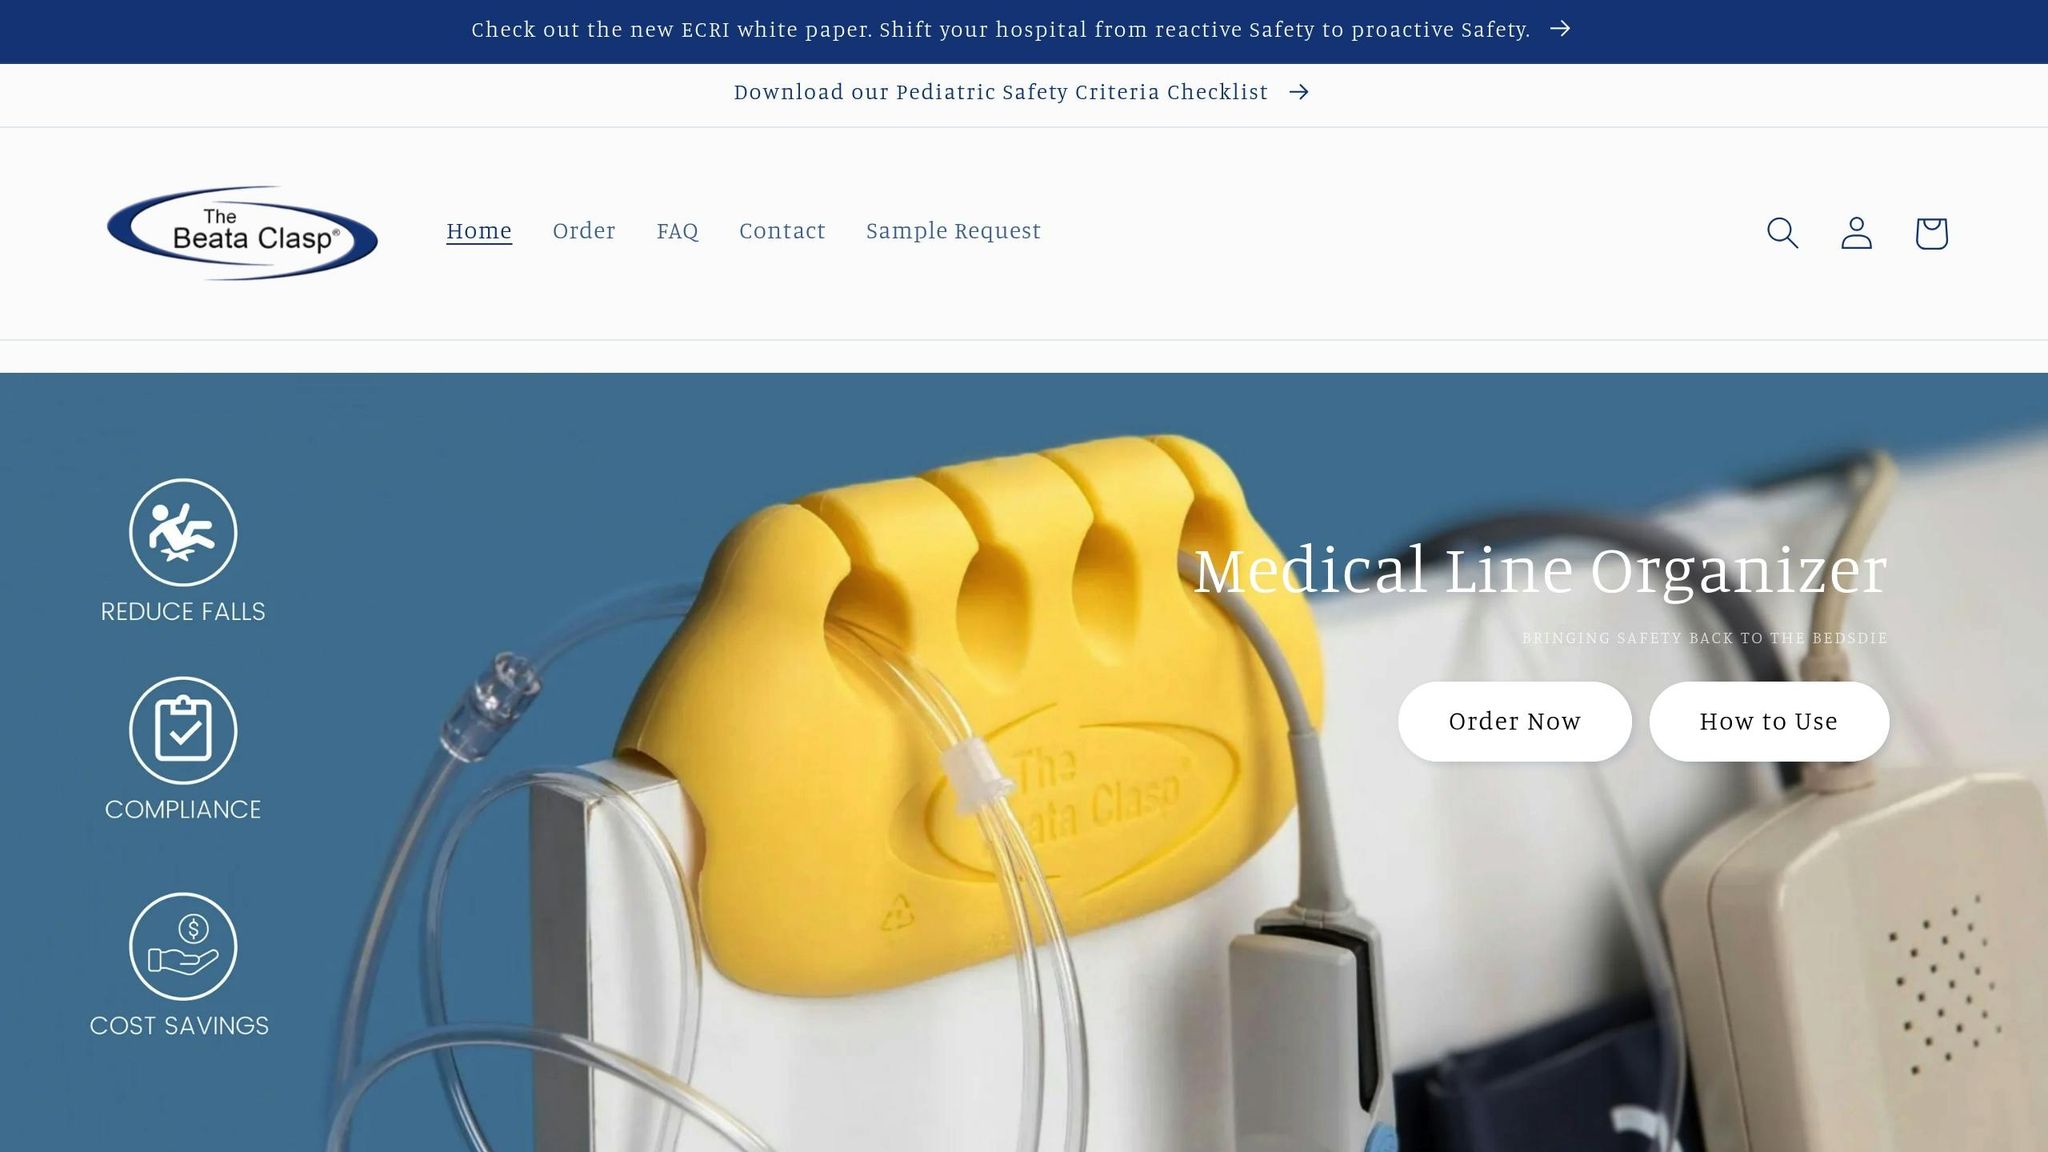
Once you've established a well-organized physical setup and clear labeling, advanced tools can take IV line management to the next level. The Beata Clasp is designed to group, elevate, and organize multiple IV lines right at the bedside. This tool minimizes tangling and helps avoid risks like accidental dislodgement, trip hazards, and contamination from lines touching the floor. By keeping everything systematically arranged, it becomes easier for clinicians to trace lines from the patient to their source - a critical safety measure during assessments and handoffs.
The Beata Clasp is antimicrobial, latex-free, and easy to clean, making it ideal for use in ICUs, medical-surgical units, and even home care settings. Its high-alert color offers visual consistency across facilities, and since it doesn’t rely on adhesives, it won’t damage equipment or leave behind residue. It’s available in several options: individual units for $19.95, evaluation packs of 10 for $163.00, or bulk orders of 25 for $467.50. By integrating into existing line management protocols, the Beata Clasp not only reduces the time nurses spend untangling lines but also helps maintain a clutter-free workspace.
Monitoring and Improving Your Line Awareness Program
Track Key Performance Metrics
After setting up your line awareness system, keeping an eye on key metrics is essential to identify strengths and areas that need attention. Focus on clinical outcomes like phlebitis, infiltration, and extravasation rates. To ensure consistency across your team, use standardized grading scales - such as 1–4 for phlebitis and infiltration, and mild to severe for extravasation. Additionally, track rates of CLABSI (central line-associated bloodstream infections) and peripheral IV catheter-related bacteremia, which occur at approximately 0.1% or 0.5 per 1,000 catheter-days.
IV-related complications can have serious implications. For instance, they can extend hospital stays by an average of two days (from 4 to 6 days) and increase costs from around $7,000 to $11,000. Even more concerning, patients with IV complications face a 3.6% risk of death, compared to just 0.7% for those without complications. Monitoring metrics like average length of stay and total costs can help you assess the impact of your program.
A real-world example comes from Chiang Mai University Hospital in Thailand. In September 2021, the hospital introduced updated IV therapy guidelines and media-based education. By August, staff achieved a 100% pass rate on an online knowledge test. A cross-sectional study conducted on December 17, 2021, evaluated 497 peripheral IV sites and found that over 80% of assessments met the new criteria. The recorded complication rates were 2.41% for phlebitis, 1.01% for infiltration, and 0.60% for extravasation.
Monitoring these metrics allows for routine audits and ensures that safety practices remain consistent. These insights pave the way for the next step - standardized procedures and regular auditing - to maintain high safety standards.
Standard Work and Auditing
Regular audits and direct observations are crucial for ensuring compliance with IV safety protocols. For example, chart audits can confirm that IV sites are inspected daily and that dressings remain intact. Automated checklists during pre-infusion assessments can standardize evaluations of vein quality and medication type, helping to minimize variability in care. Assigning specialized Vascular Access Teams (VATs) to manage complex insertions and conduct routine site checks can further improve outcomes.
A study published in BMJ Open Quality highlights the benefits of improved surveillance in a neonatal intensive care unit. Initially, the baseline rate of IV infiltrates was 5 per 1,000 line days. After introducing evidence-based guidelines, staff education, and compliance checklists, the rate increased to 9 per 1,000 line days. While this rise indicates better detection, the number of severe Stage 4 infiltrates significantly decreased, showcasing the effectiveness of the new management approach.
Improve Practices with PDSA Cycles
Using audit results, Plan–Do–Study–Act (PDSA) cycles provide a structured way to enhance IV line management. These cycles allow you to address specific safety gaps, such as high complication rates or frequent line dislodgements. For instance, you could introduce targeted interventions like improved labeling systems or automated pre-infusion checklists, testing them on a small scale first. Real-time incident reporting software can help monitor outcomes and detect patterns in complications.
Consider the example of SJCHS, a 644-bed system, where CQI data identified heparin and propofol as the culprits behind 73% of the highest-risk averted overdoses. By refining the heparin protocol, the risk priority score dropped by 73% (from 210 to 56). Similarly, implementing a targeted ICU sedation protocol reduced propofol dosing alerts by over 50%, cutting costs from $1,774,395 to $650,330.
Based on the data, refine your protocols and workflows. For example, if you notice frequent alerts for a specific medication, adjust the drug library or clinical guidelines to improve safety and efficiency. The ultimate goal is to use local data to make continuous improvements tailored to your facility's unique challenges and needs.
Conclusion: Making Safety Simple with Line Awareness
Putting IV line awareness into practice doesn’t have to be complicated. Start with clear, standardized protocols and bring together a multidisciplinary team to ensure every clinical perspective is taken into account. Pay attention to the basics: keep lines physically organized, label everything clearly, date administration sets, and use tools to secure lines and keep them off the floor. These simple steps can go a long way in preventing costly and dangerous complications.
The stakes are high. IV failure rates can climb to 53%, and complications can add two extra days to a hospital stay, with costs jumping from $7,000 to $11,000. Even more alarming, patients with IV complications face a 3.6% risk of death compared to just 0.7% for those without. These numbers make it clear: line awareness is not just a good idea - it’s a necessity.
Tools like the Beata Clasp make it easier to stay organized. By reducing line entanglement, preventing trips and falls, and incorporating antimicrobial materials and high-alert colors, this tool helps staff provide consistent care at the bedside. Paired with ultrasound-guided placement, smart pumps with Dose-Error-Reduction Software, and automated checklists, these tools build a robust safety net to minimize errors.
To keep these improvements on track, use PDSA cycles to refine your processes based on local data. Monitor key metrics like phlebitis rates, CLABSI incidence, and average length of stay to pinpoint successes and areas for improvement. Educate patients to recognize and report early signs of complications, ensuring problems are addressed quickly. With the right systems in place, safety becomes second nature, leading to better outcomes for everyone involved.
FAQs
What are the essential steps for ensuring IV line safety and preventing complications?
To maintain IV line safety and reduce complications, always prioritize sterile techniques when handling both the lines and related equipment. Check IV sites regularly - every 1 to 4 hours - for any signs of infection, irritation, or other potential issues. Make sure lines are securely placed and neatly arranged to avoid tangling or accidental dislodgement.
Choose the right catheter size and type based on the specific needs of the patient, and stick to recommended guidelines for site rotation or line replacement to help lower the risk of infection. Take time to educate patients on how to care for their IV lines, what warning signs to look out for, and encourage them to voice any concerns. Addressing issues promptly ensures both their safety and comfort.
What is line mapping, and how does it help ensure safe and accurate medication delivery?
Line mapping is a straightforward and systematic way to label and track IV lines. It ensures that medications, IV lines, and patients are correctly matched, reducing the chances of confusion or mix-ups. This helps prevent serious errors, like giving the wrong medication or connecting to an incorrect line.
Beyond enhancing patient safety, line mapping also simplifies tasks for healthcare teams. It allows them to manage multiple IV lines more efficiently and helps avoid issues such as dosing errors or potential infections.
What are the best tools and strategies for managing IV lines safely and efficiently?
To handle IV lines effectively, prioritize organization and patient safety. Secure the lines with appropriate devices to prevent them from shifting or coming loose. Keep the tubing neatly arranged to avoid tangling, which can lead to complications. Regularly check the site using the TOUCH, LOOK, and COMPARE method - this helps you catch any potential issues early on. Always maintain proper hand hygiene and use thoroughly disinfected equipment to reduce the risk of infection. You can also incorporate automated checklists or reporting tools to quickly identify and address any complications. These practices not only improve efficiency but also ensure the highest level of care for patients.