
Many IV line infections can be prevented with a small set of repeatable steps. In U.S. hospitals, about 30,100 CLABSIs happen each year, and peripheral IVs also cause bloodstream infections. The biggest ways I cut risk are simple: clean hands, strong skin prep, clean insertion, daily site checks, hub scrubbing, and fast line removal when the line is no longer needed.
If I had to boil the whole article down, it would be this:
-
Insert lines cleanly
- Use hand hygiene right before placement
- Use full sterile barriers for central lines
- Prep skin with chlorhexidine-alcohol when used
- Pick the lowest-risk site and the fewest lumens
-
Maintain lines the same way every day
- Check the site every shift
- Change loose, wet, or dirty dressings at once
- Scrub the hub for at least 15 seconds before each access
- Keep tubing labeled, secure, and off the floor using effective line management strategies
-
Remove lines early
- Review each line every day
- Remove peripheral IVs if they are not being used or if the site looks bad
- Do not keep any central line “just in case”
-
Back bedside steps with unit-wide checks
- Use bundle checklists
- Audit practice and share results
- Recheck staff skills at least yearly
- Track infection rates and line use over time
A few numbers stand out. Peripheral IV infection rates are lower per line-day than central lines, but they are used so often that the total burden can still be high. One study found risk went up after day 3, and 80% of peripheral IV bloodstream infections happened after day 4. That’s why daily review and line removal matter so much.
This article is, at its core, a practical guide to what to do at insertion, what to do each day, when to pull the line, and how hospitals keep these steps consistent.
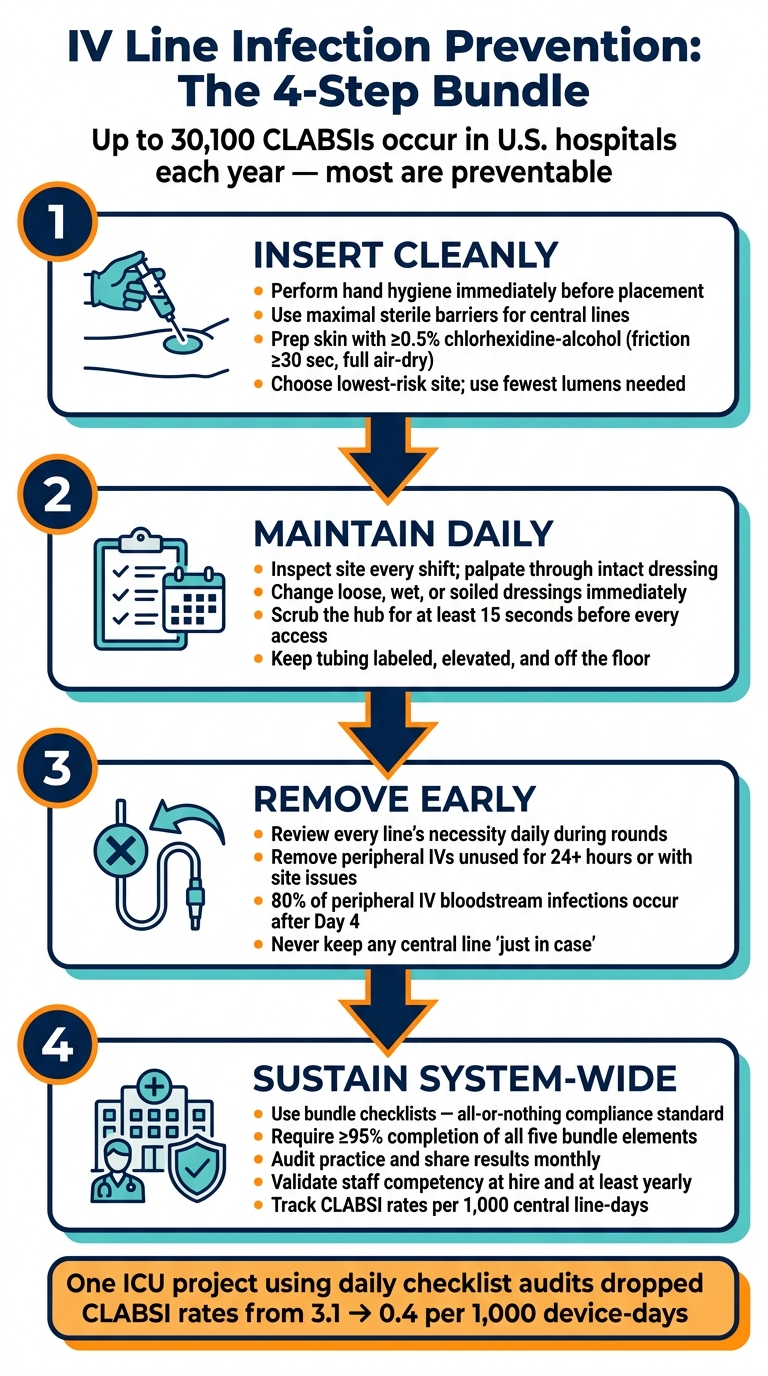
IV Line Infection Prevention: The 4-Step Bundle
Prevention of Catheter-Associated Bloodstream Infections by D. Morrow | OPENPediatrics

sbb-itb-f779e18
Insertion Practices That Lower Infection Risk
Insertion is the moment when infection prevention matters most. A tight bundle of safer hospital protocols makes the biggest difference: hand hygiene, full sterile barriers for central lines, chlorhexidine-alcohol skin prep, smart site choice, fewer catheter lumens, and a sterile dressing right after placement.
Hand Hygiene, Sterile Barriers, and Chlorhexidine Skin Prep
Clinicians should perform hand hygiene with alcohol-based hand rub or soap and water immediately before putting on gloves for any vascular access procedure.
For central line insertion, use maximal sterile barrier precautions: cap, mask, sterile gown, sterile gloves, and a large full-body sterile drape. Peripheral IVs are different. They call for clean or sterile gloves and a small sterile field, not maximal sterile barriers.
For central lines, ≥0.5% chlorhexidine in alcohol is the first-line skin antiseptic. In practice, that usually means 2% chlorhexidine in 70% isopropyl alcohol. Scrub the skin with firm back-and-forth friction for at least 30 seconds. Use more time for femoral or moist sites, then let the area air-dry all the way before puncturing the skin. If hair removal is needed, use electric clippers, not razors.
For peripheral IVs, use 70% alcohol or alcoholic chlorhexidine. When it's available and not contraindicated, ≥0.5% CHG in alcohol is preferred.
Once the field is prepped, the next step is simple: pick the site with the lowest risk and use only the lumens you need.
Site Selection, Lumen Minimization, and Initial Securement
For adult central venous catheters, the subclavian vein is often the better choice when feasible. The femoral vein should be avoided when possible, especially in obese adults, because infection and thrombosis risk are higher there. For peripheral IVs, distal upper-extremity sites like the hand or forearm are preferred. Lower-extremity sites should be avoided when possible.
Use the fewest lumens necessary. Single-lumen central venous catheters are preferred unless the patient clearly needs separate channels for incompatible medications, vasoactive drugs, or parenteral nutrition.
After the catheter is placed, cover the site with a sterile transparent semipermeable dressing or a sterile gauze dressing once the antiseptic has dried. For central lines, mechanical securement devices are preferred over sutures. Peripheral IVs should be secured well enough to prevent movement and dislodgement. Proper securement also helps prevent IV line entanglement during patient movement.
After placement, daily site checks and hub disinfection become the main line of defense.
Comparison Table: Central Line vs. Peripheral IV Insertion Practices
Set side by side, the biggest differences come down to site choice, barrier level, and how the line is secured.
| Practice | Central Line | Peripheral IV |
|---|---|---|
| Preferred site | Subclavian or internal jugular when feasible; avoid femoral in adults when possible | Distal upper extremity (hand, forearm); avoid lower extremity when possible |
| Skin antisepsis | ≥0.5% CHG in alcohol (usually 2% CHG / 70% isopropyl alcohol); friction ≥30 sec; full air-dry | 70% alcohol or alcoholic chlorhexidine; same friction and drying principles; ≥0.5% CHG in alcohol preferred when available and not contraindicated |
| Barrier precautions | Maximal sterile barriers: cap, mask, sterile gown, sterile gloves, full-body sterile drape | Clean or sterile gloves and a small sterile field |
| Lumen selection | Fewest lumens necessary; single-lumen preferred unless multi-lumen is clinically required | Use the smallest gauge that meets therapy needs |
| Initial dressing | Sterile transparent semipermeable or sterile gauze dressing after antiseptic dries; mechanical securement preferred over sutures | Sterile transparent dressing; secure to prevent movement and dislodgement |
Daily Line Care and Contamination Control
Once a line is in place, the day-to-day work starts. Small, steady habits matter here: checking the site, keeping the dressing in good shape, disinfecting the hub, and keeping tubing neat and easy to follow. That’s what helps keep the line protected.
Site Checks, Dressing Changes, and Hub Disinfection
Inspect the site every shift, and palpate through an intact dressing. Watch for redness, warmth, swelling, tenderness, or drainage. For central lines, record these checks with a standard CLABSI checklist. Peripheral IVs need the same level of attention. If you see pain, hardness, or streaking, remove the IV.
Dressings need to be changed on schedule. For central lines, transparent semipermeable dressings should be changed every 5–7 days, while gauze dressings should be replaced every 2 days. Change either one right away if it becomes loose, damp, or visibly soiled. In high-risk patients, such as those in the ICU or who are immunocompromised, chlorhexidine-impregnated dressings may be considered when CLABSI rates stay high even with standard bundle use.
Every access starts with hub disinfection. Scrub the hub or needleless connector with 70% isopropyl alcohol or alcoholic chlorhexidine for at least 15 seconds, then let it dry all the way before access. Administration sets for continuous infusions are usually changed every 72–96 hours. Blood products and lipid infusions call for more frequent changes.
Line Organization and Environmental Contamination Prevention
Clean technique at the access point is only part of the job. Tubing also needs to stay visible, untangled, and off the floor. When lines drape onto the floor or pile up at the bedside, it gets harder to prevent hub contamination, harder to trace the right line, and easier for proper disinfection before access to get missed. Keeping tubing secure, elevated, and easy to see is a practical daily target, not just tidiness for its own sake.
A few simple habits help:
- Secure tubing to the bed or gown with proper anchors
- Label each line at the bag, tubing, and hub to avoid misconnections
- Limit extra extensions or stopcocks that add more contamination points
Daily safety rounds should also include a fast visual check: are the lines off the floor, labeled, and easy to trace from bag to hub? Organized tubing makes that easier. Beata Clasp can help keep tubing organized, elevated, and easy to trace, which supports infection-control workflow.
Comparison Table: Central Line vs. Peripheral IV Daily Maintenance
The main differences come down to timing, charting, and when to remove the line.
| Practice | Central Line | Peripheral IV |
|---|---|---|
| Hand hygiene | Required before and after every access, assessment, or dressing change | Required before and after every access, assessment, or dressing change |
| Site assessment | At least once per shift; document using a CLABSI checklist; inspect and palpate for redness, swelling, tenderness, or drainage | Each shift; assess for phlebitis signs such as pain, hardness, or streaking; remove promptly if suspected |
| Dressing change timing | Transparent: every 5–7 days; gauze: every 2 days; immediately if loose, damp, or soiled | Per facility policy; replace immediately if lifting, wet, or contaminated; remove the catheter if the site is infected |
| Hub disinfection | Scrub the hub for at least 15 seconds with 70% alcohol or alcoholic CHG before every access; allow it to dry; consider antiseptic caps between uses | Same scrub-the-hub principle before every medication administration, flush, or blood draw |
| Tubing organization | Keep lines labeled, elevated, and off the floor; limit stopcocks and unnecessary extensions; trace from bag to hub before each infusion | Secure to prevent snagging, pulling, or floor contact; label clearly |
| Documentation | Daily necessity review, site condition, dressing date, and hub disinfection | Insertion date; site condition; phlebitis score; reason for removal |
Removal, Replacement, and Device Utilization Decisions
Once a line is in and daily care is underway, the next job is simple: take it out as soon as it’s no longer needed. Every extra catheter day adds more infection risk. A daily review of line need cuts line-days and lowers CLABSI risk.
Daily Line Necessity Review and Prompt Removal of Unneeded Devices
Each day, the team should ask whether every line still has a live reason to stay in place. Build that check into multidisciplinary rounds for every central line, PICC, and peripheral IV. A checklist, daily goals sheet, or EHR prompt can make this routine instead of hit-or-miss.
Clear reasons to keep a central line or PICC include:
- Ongoing vasopressor or other irritant infusions
- TPN
- Hemodialysis or apheresis
- Continuous hemodynamic monitoring
- Documented difficult peripheral venous access
If none of those reasons still apply, flag the line for same-day removal. For peripheral IVs, document the need at least once a day and remove the catheter if it’s no longer needed or hasn’t been used for 24 hours or more.
Bedside nurses play a big part here. They should flag unused lines and push for removal once the indication is gone.
When to Remove or Replace a Line
Daily review matters, but some signs call for immediate reassessment. Local findings that should trigger prompt evaluation include insertion-site tenderness, erythema, warmth, swelling, purulent drainage, or a palpable venous cord. Systemic signs such as fever without another clear source, chills, hypotension, or tachycardia should trigger evaluation for catheter-related bloodstream infection, especially with non-tunneled central lines.
That said, don’t pull a central line or PICC for fever alone. First look for other sources, check the patient’s clinical stability, and think through the likely pathogen. Peripheral IVs are different. The bar for removal is lower, so remove the catheter for phlebitis, infiltration, occlusion, or suspected infection without waiting.
Catheters placed during an emergency or under nonsterile conditions should be clearly labeled and replaced with full sterile barrier precautions once the patient is stable.
INS supports clinically indicated PIV removal, not routine 72- to 96-hour replacement.
Comparison Table: Removal and Replacement Triggers by Device Type
The table below separates routine reassessment from urgent removal.
| Trigger | Non-tunneled Central Line | PICC | Peripheral IV |
|---|---|---|---|
| Therapy complete / no longer needed | Remove promptly | Remove promptly | Remove promptly |
| Unused for 24 hours or more | Reassess indication; remove if no longer needed | Reassess indication; remove if no longer needed | Remove |
| Local infection signs | Remove promptly and evaluate for catheter-related infection | Remove promptly and evaluate for catheter-related infection | Remove immediately |
| Systemic signs / suspected CLABSI | Strong trigger for removal and new-site access if needed | Strong trigger for removal and new-site access if needed | Remove and seek alternative access |
| Emergency or nonsterile placement | Replace under full sterile barrier when stable | Replace under full sterile barrier when stable | Re-site under aseptic technique once controlled |
| Occlusion or malfunction | Evaluate; replace if unresolved | Evaluate; replace if unresolved | Remove and re-site |
| Phlebitis or infiltration | Not typically applicable | Not typically applicable | Remove immediately |
| Fever alone | Do not remove solely for fever; use clinical judgment | Do not remove solely for fever; use clinical judgment | Assess the site; remove if indicated |
System-Level Practices That Support Consistent Low Infection Rates
Standard Bundles, Competency Checks, and Audit Feedback
After insertion, maintenance, and removal steps are standardized, the next job is making sure they happen the same way on every unit. That's what keeps CLABSI rates low over time. A few people doing the right thing isn't enough. The whole facility has to do it, every time.
Written bundle policies by themselves don't lower CLABSI rates. One U.S. pediatric study found lower rates only when at least 95% of all five bundle elements were completed.
That’s why bundle compliance should be treated as all or nothing. If one required step is missed, the bundle is noncompliant for that encounter. This standard works best when teams pair it with direct observation and checklist-based audits by infection preventionists, charge nurses, or IV specialists. Those audits show exactly where practice slips.
One coronary ICU project used daily checklist audits, weekly compliance tracking, and routine team feedback. CLABSI dropped from 3.1 to 0.4 per 1,000 device-days.
Audit findings should feed straight into competency checks. Staff competency should be validated at hire and checked again at least once a year, with focused remediation when audits show repeat gaps. The most useful competency checks match the bundle used at the bedside, including:
- observed hand hygiene
- sterile barrier setup
- skin prep technique
- hub disinfection timing
When the competency checklist matches the bundle, education and day-to-day expectations stay aligned.
Surveillance, Policy Updates, and Workflow Support
Good surveillance looks at more than one metric. Teams should track CLABSI rates per 1,000 central line days, device utilization ratios, and bundle adherence data so they can tie practice gaps to infection trends. The CDC's standardized utilization ratio (SUR) compares device use against a national baseline that uses 2015 as the reference point. Monthly unit-level feedback, shared in huddles or on quality dashboards, helps keep the data in view and tied to action.
Policy reviews shouldn't happen only because the calendar says it's time. They should happen when new national guidelines come out, when local infection clusters appear, or when products change. An interprofessional review committee with infection preventionists, nursing leadership, and physicians can turn updated CDC, INS, or SHEA guidance into revised order sets and job aids.
Workflow tools can also make day-to-day care cleaner and easier. They can help organize lines and cut down clutter around the patient. BeataClasp, an antimicrobial, latex-free IV line organizer, can help keep multiple lines organized and off the floor as an adjunct to core infection-control steps. Tools like this should support core prevention steps, not stand in for them.
Conclusion: Key Practices to Prioritize
These system controls help turn bedside best practices into routine care. Low infection rates are more likely when teams stack reliable steps across the full life of the line: maximal sterile barriers and chlorhexidine skin prep at insertion, strict daily hub disinfection and site assessment, and prompt removal when the line is no longer needed. Frontline teams need standardized bundles, regular competency validation, direct audits, and timely feedback. When workflow tools are available, high-risk units such as ICUs and oncology wards should come first, since line burden is highest there. Infection prevention needs to be treated as a system-level commitment that continues day after day.
FAQs
Why is scrubbing the hub so important?
Scrubbing the IV hub helps prevent infections by removing pathogens before they can enter the patient’s bloodstream during line access. Healthcare professionals should scrub it with 70% isopropyl alcohol for 15 seconds.
This step is a basic part of sterile technique and safe IV management. Alcohol-impregnated disinfecting caps can also help protect ports and support efforts to reduce bloodstream infections.
How often should an IV line be checked or removed?
IV sites should be checked every 4 hours. For high-risk patients, they need to be checked more often.
In ward settings, staff usually monitor the site every 4 to 8 hours to watch for infection, phlebitis, or infiltration.
Catheters should be removed as soon as they’re no longer clinically needed. If staff notice inflammation, infection, or any other complication, the site should be checked at once and the catheter should be removed right away.
What mistakes most raise infection risk?
The biggest mistakes usually come down to breaks in sterile technique and poor IV site or tubing care.
Common causes include:
- poor hand hygiene
- inadequate skin antisepsis
- not using full sterile barriers during central line insertion
- failing to disinfect connector hubs
Risk also goes up when labeling is inconsistent, site checks don't happen often enough, and catheter removal is delayed.
Then there’s the tubing itself. When tubing gets tangled, it can touch the floor, pull at the line, or even lead to dislodgement. Beata Clasp helps keep tubing secure, elevated, and organized.