
Poor IV line handling leads to infections, failed lines, falls, and treatment delays. In U.S. care settings, CLABSIs cause about 30,000 to 41,000 cases each year, and each case can add $40,000 to $50,000 in cost. Peripheral IVs fail often too, with an all-cause failure rate of 36%.
If I had to boil this guide down, it comes to four steps:
- Check every line before use
- Keep tubing labeled, visible, and off the floor
- Clean hubs and watch the site at each check
- Act fast when you see swelling, pain, resistance, leaks, or fever
This guide explains how I’d apply those steps across hospitals, ICUs, infusion centers, and home care. It covers line setup, routing, daily care, common failure signs, clutter control, fall risk, and what to look for in bedside line organizers.
A few points stand out right away:
- Scrub the hub before every access
- Trace the line from patient to source at handoff and reconnection
- Change wet, loose, or soiled dressings right away
- Do not force a flush if there’s resistance
- Check high-risk patients more often, sometimes every 1 to 2 hours
- Use a fixed response when infection, occlusion, infiltration, or dislodgement is suspected
Here’s the main idea: safe IV care is not just about insertion. It’s about what happens every shift, every access, and every move around the bed.
Routes of administration: Peripheral IVs, Central Venous Catheters - Pharm Basics | @LevelUpRN
sbb-itb-f779e18
IV line setup and routing
Before any infusion starts - or when you change a bag, adjust a rate, or reconnect a line - pause and check the basics: the order, the patient’s identity, hand hygiene, and aseptic technique. Use Bag–Pump–Patient (BPP): match the bag to the order, confirm the pump settings, then check the access site. That simple sequence helps keep each line easy to trace, maintain, and handle without mix-ups.
Hand hygiene is a must. Clean your hands with soap and water or an alcohol-based hand rub before and after site palpation and before catheter insertion or manipulation. For skin prep, use an alcohol-based chlorhexidine solution and let it air-dry completely before moving on. Once the antiseptic is on, don’t palpate the site again unless aseptic technique is still in place.
Verify the line type, access site, and therapy plan
The line should fit both the therapy and the expected length of treatment. As a general rule, think about a midline or PICC instead of a short peripheral catheter when IV therapy will likely go beyond 6 days. Here’s the quick breakdown:
| Line Type | Common Use | Best-Fit Setting |
|---|---|---|
| Peripheral IV | Short-term fluids, routine meds, low-risk antibiotics | ED, med–surg units, outpatient infusion centers |
| Midline Catheter | Intermediate-duration therapy, non-central infusions | Step-down, long-term acute care, selected home care |
| Central Line (CVC/PICC) | Long-term therapy, vesicants, TPN, high-osmolarity solutions | ICUs, oncology units, complex home infusion |
When the line type matches the therapy from the start, you cut down on mid-course changes and reduce staff burden. After that decision is made, route the line so access stays open, the tubing stays visible, and flow stays smooth.
Label and trace each line from patient to source
Physical line tracing means following each tube from the patient’s access site all the way back to the source bag or pump channel. It’s a key safety check, and it should happen at every handoff, before any infusion is connected or reconnected, and whenever a new line is added. In busy ICUs, where several infusions may run at once, this step can catch unlabeled lines, surprise Y-site connections, and tubing hidden under blankets or behind equipment.
Labeling supports tracing by making each line easy to tell apart at a glance. At minimum, each label should include:
- Drug name and concentration
- Dose or infusion rate
- Date and time of tubing change
- Line type
- Clinician initials
Place the main label above the injection port closest to the insertion site. Put secondary line labels near the connection point between the secondary and primary lines. High-alert medications - such as vasopressors, chemotherapy, and anticoagulants - should run on dedicated lines with clear alert labels so staff know to use extra care. A standard routing pattern helps too: run IV lines toward the patient’s head and non-IV tubes, like enteric lines, toward the feet to lower the risk of misconnections.
Route tubing to reduce pulling, kinking, and floor contact
Once the line is verified and labeled, bedside routing becomes the next step. Tubing on the floor can pick up contaminants and create trip hazards for both staff and patients. Poorly managed infusion lines were ranked #8 on ECRI's Top 10 Health Technology Hazards for 2025. Route tubing with enough slack for repositioning and passive range of motion, but not so much that it creates drag or tangles. Avoid sharp bends and kinks.
Skip improvised bundling methods like tape or rubber bands. They can trap bacteria and increase kinking. In beds with multiple lines, Beata Clasp can help keep tubing separated, visible, and off the floor. It is antimicrobial, latex-free, and easy to clean. When tubing is organized, it stays easier to monitor during handoffs.
After routing is in place, the next step is daily inspection and cleaning to keep the line safe and working as intended.
Daily cleaning and maintenance
IV safety doesn't stop once the line is in place. Every shift, visit, and access point is another moment where things can either stay on track or start to go wrong. After setup and routing, day-to-day maintenance is what keeps the line clean, visible, and secure.
Inspect the site and maintain dressing integrity
At each shift or home care visit, check the insertion site for redness, swelling, warmth, drainage, and tenderness. Ask the patient about pain at rest and with palpation. New or increasing discomfort often shows up before you can see any change. Then look at the dressing. It should be clean, dry, intact, and not lifting at the edges.
Moisture changes the picture fast. Sweat, fluid leakage, or blood can break the barrier, so the dressing needs to be changed right away instead of waiting for the next routine interval.
If an opaque dressing is in place and the patient reports tenderness, or if infection is suspected, remove the dressing so you can see the site directly. For central lines, transparent dressings are changed at least every 7 days, while gauze dressings are changed at least every 2 days. Those time frames are the outer limit, not the goal. If the dressing is loose or soiled, change it at once.
Follow unit policy for how often reassessment should happen. The table below shows how that timing shifts by care setting.
Clean hubs, flush correctly, and replace compromised components
Scrub the hub before every access. No exceptions. Use 70% isopropyl alcohol or an alcoholic chlorhexidine gluconate solution with firm mechanical friction, then let the hub air dry fully before connecting. If you wipe and connect right away, you skip part of the disinfection step.
For flushing, use preservative-free 0.9% normal saline and a pulsatile (push-pause) technique. This helps clear the lumen better than one steady push. Use at least 10 mL for central lines, with a 10 mL syringe or larger, to avoid too much pressure. Flush before and after each medication, before and after blood draws, and between incompatible solutions.
If you meet resistance during flushing, stop there. Don't force it. Resistance is a warning sign and should prompt an assessment for occlusion or malposition first.
Components should be replaced when they're compromised, not only when the calendar says so. A hub with blood backup, a connector that's visibly soiled, or a dressing that's wet all need immediate clinically indicated changes, no matter when the last scheduled change took place. Some protocols also call for scheduled needleless connector changes, such as every 72 hours, or sooner if contamination is suspected.
Adjust maintenance by setting
The care setting changes who does the work and how closely each step is watched. In hospitals and ICUs, nursing staff handle the full process. In home care, patients and caregivers often do a big part of it themselves. That's why teaching can't be vague. It has to be direct and usable: scrub, let it dry, then connect.
Disinfection caps can help with passive hub disinfection between accesses in home settings.
The table below shows how core maintenance tasks vary across settings:
| Maintenance Task | Hospital (Med-Surg) | ICU | Outpatient Infusion | Home Care |
|---|---|---|---|---|
| Site inspection frequency | Every shift and before intermittent infusions | Every 1–4 hours depending on acuity | Start of visit, before rate or medication changes, and end of visit | Each nurse visit; daily self-check and before use |
| Dressing change (transparent) | Every 7 days or sooner if compromised | Every 7 days or sooner if compromised | Weekly or if compromised | Weekly or if integrity is lost |
| Hub disinfection | Before every access | Before every access | Before every access | Before every access |
| Flushing frequency | Before and after each medication; at least once per shift if continuously infusing | Per therapy schedule, with more frequent patency checks in higher-acuity patients | Start and end of session; between drugs | Daily for intermittently used lines; before and after each home infusion |
| Primary responsibility | Nursing staff | Nursing staff | Infusion nurse or clinical staff | Patient, caregiver, and home health nurse |
Scheduled changes follow policy. Clinically indicated changes happen when the site or component is compromised. Skip either one, and problems like infection, occlusion, infiltration, and dislodgement can build without much warning.
Safety risks and common failure points
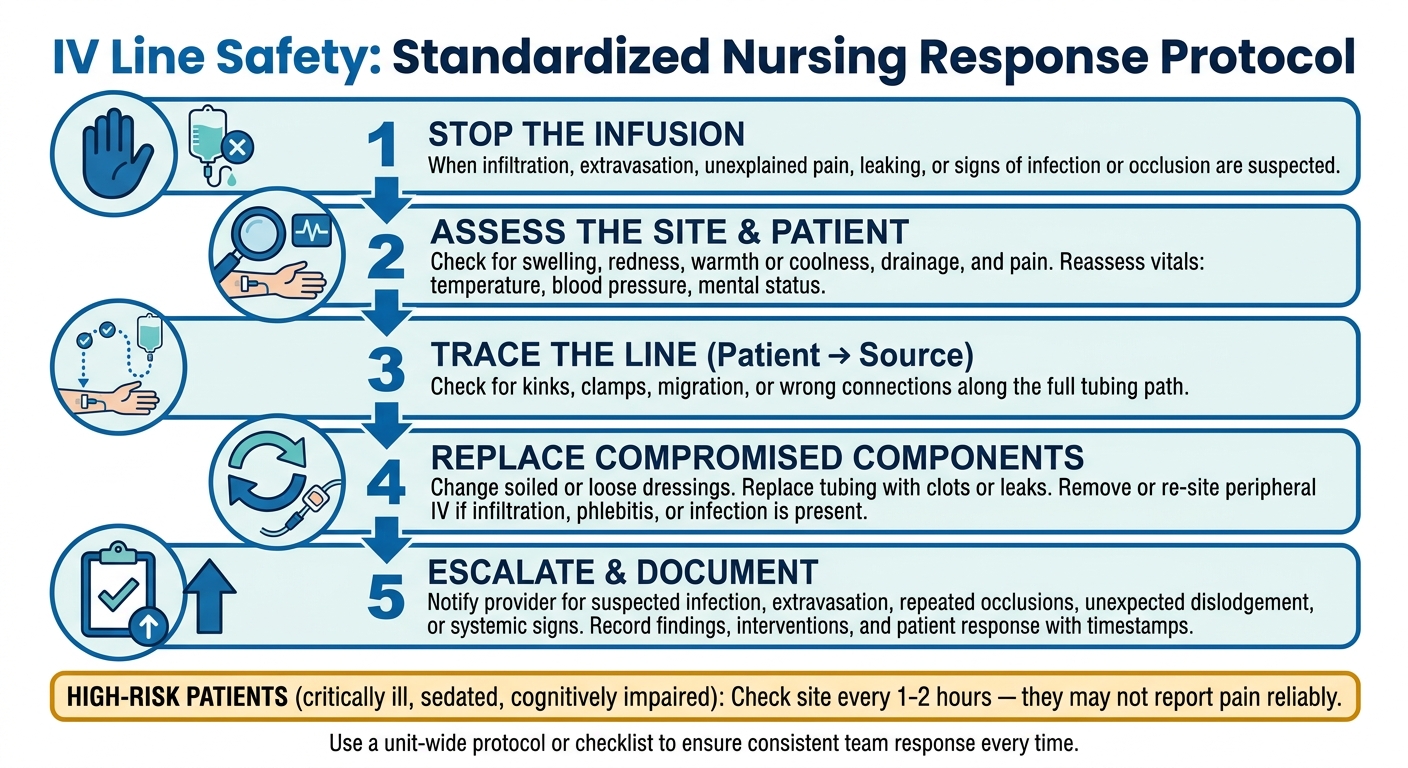
IV Line Safety: 5-Step Nursing Response Protocol
When an IV line changes without warning, routine maintenance is no longer enough. At that point, the job shifts to troubleshooting. The goal is simple: spot the problem fast, follow a set response, and keep it from turning into patient harm.
The big issues are usually the same ones bedside teams watch for every day: infection, occlusion, infiltration, and dislodgement. Daily checks matter because they help catch these problems before they spiral.
Recognize infection, occlusion, infiltration, and dislodgement early
Each of the main IV problems tends to show up in its own way.
Infection may show up as redness, warmth, swelling, tenderness, purulent drainage, or streaking along the vein. Systemic signs can include fever ≥100.4°F (38°C), chills, hypotension, malaise, or new confusion. Those findings need prompt escalation because they may point to a catheter-related bloodstream infection.
Occlusion often shows up as an infusion that slows down or stops, pump occlusion or high-pressure alarms, more resistance during flushing, visible clots, or absent blood return when blood return is expected.
Infiltration usually looks like swelling, coolness, tightness at the site, leaking fluid, pain, or blanching. It is one of the most common peripheral IV complications.
Dislodgement can be easy to spot, like catheter movement or bleeding at the insertion site. But it can also be subtle, such as catheter migration or tubing that has shifted out of place. In pediatric patients and older adults, the first sign may be irritability, guarding of the limb, or new agitation.
For patients who are critically ill, sedated, or cognitively impaired, site checks should happen more often - every 1–2 hours - because they may not be able to report pain or discomfort in a reliable way.
Control bedside clutter, entanglement, and fall risk
Messy line setup causes direct problems at the bedside. Tubing that touches the floor picks up contamination. Tangled lines create trip hazards. Tension on a line during repositioning can pull it loose before anyone notices.
You see this all the time in ICUs, where several IV lines and monitor cables can cross over each other. On medical-surgical units, falls and dislodgement often happen when patients walk with tubing that has not been managed well. In home care, rugs, tight walkways, and low furniture can turn floor-level tubing into a hazard, especially for children and older adults.
A few simple habits help a lot:
- Use set routing patterns
- Bundle related lines together
- Keep extra tubing secured off the floor before the patient moves
It also helps to do a clutter check before ambulation or transfers. Make sure no tubing is caught under wheels, side rails, or other equipment. That small pause can prevent pulling, dislodgement, and falls.
The Beata Clasp can help keep lines separated, visible, and off the floor. It is antimicrobial, latex-free, and easy to clean.
Standardize the nursing response when problems appear
When a problem shows up, go back to the same patient-to-source trace used during setup. This time, use it to find the failure fast. A standard response gives staff a clear path instead of making each event a judgment call.
- Stop the infusion when infiltration, extravasation, unexplained pain, leaking, or signs of infection or occlusion are suspected.
- Assess the site and patient for swelling, redness, warmth or coolness, drainage, and pain. Reassess vital signs too, including temperature, blood pressure, and mental status.
- Trace the line from patient to source to check for kinks, clamps, migration, or the wrong connection.
- Replace compromised components by changing soiled or loose dressings, replacing tubing with clots or leaks, and removing or re-siting a peripheral IV if infiltration, phlebitis, or infection is present.
- Escalate and document by notifying the provider for suspected infection, extravasation, repeated occlusions, unexpected dislodgement, or systemic signs, and by recording findings, interventions, and patient response with timestamps.
Using a unit-wide protocol or checklist for this sequence helps teams respond the same way each time. That supports staff training, audit work, and quality improvement over time.
These failure points should shape the product criteria in the next section.
Workflow efficiency and product selection
When line clutter starts getting in the way of care, the next move is picking organizers that cut mistakes without adding extra steps. At the bedside, the problems are pretty straightforward: tracing errors, tangled lines, tubing touching the floor, and wasted time.
One ICU simulation study showed how much this can matter. Labels plus physical organizers dropped infusion identification errors from 7.7% to 0% and cut identification time from 1 minute 20 seconds to 31 seconds.
Choose features that support cleaning, visibility, and safe routing
Pick organizers that are easy to disinfect, keep lines easy to see, and hold tubing in place during movement.
The device needs to stand up to routine disinfectant wipes, bleach, and soap and water. Antimicrobial material can add surface protection between cleanings. Latex-free construction also matters for patient and staff safety, especially in facilities that follow latex sensitivity protocols.
Line visibility matters just as much. During tracing, clinicians should be able to follow the tubing without taking it out of the organizer. Open channels help with that. The organizer should also attach firmly to bed rails, stretchers, or walkers without tools, hold tubing up to 0.625 inches (15.875 mm) in diameter, and keep lines lifted off the floor while the patient is moving.
Assess ICU vs regular ward IV line management and home care needs
Start with the workflow, then match the organizer to the setting.
| Setting | Clinical Priority | What to Evaluate |
|---|---|---|
| Hospital (med-surg) | High turnover, fall prevention | Easy cleaning between patients, simple attachment and removal, floor-contact prevention |
| ICU | Multiple concurrent infusions, complex setups | Capacity for several lines and visibility for fast tracing |
| Outpatient clinic | Short visits, minimal setup time | Fast attachment and removal |
| Home care | Caregiver-managed, mobility-focused | Simple use, secure attachment, latex-free materials |
Home care changes the equation a bit. Caregivers often need something simpler and easier to use. The organizer also has to help with fall prevention and keep lines secure during day-to-day movement.
Apply product criteria to bedside organization decisions
Use bedside workflow criteria to compare products, instead of leaning on marketing language.
| Criterion | Why it matters | Bedside impact |
|---|---|---|
| Cleanability | Meets infection control protocols | Lowers contamination risk between patients and during routine care |
| Material safety | Latex-free, antimicrobial construction | Safe for sensitive patients; limits surface bacterial growth |
| Visibility | Open design for line tracing | Supports fast identification and reduces medication errors |
| Stability | Secures to bed rails without clutter | Keeps lines elevated and lowers dislodgement risk during movement |
| Versatility | Fits multiple surfaces and settings | Attaches to bed rails, stretchers, or walkers so the organizer can move with the patient |
| Entanglement control | Separates IV, oxygen, and monitor lines | Lowers fall risk and pulling during repositioning or ambulation |
| Cost and value | Justifies investment through safety gains | Measured against adverse event reduction and nurse time saved |
The Beata Clasp from BeataClasp is a medical IV line organizer built around these criteria. Beata Clasp fits these needs and can be piloted across hospital, ICU, outpatient, and home care workflows.
Using the same criteria across units helps standardize bedside organization.
Conclusion: A practical standard for safer IV line management
Safe IV line management comes down to four habits done every single time: verify every line, route tubing safely, maintain sites and hubs without shortcuts, and move fast when something looks off. The hard part isn't that these steps are complicated. It's doing them with the same care on a busy Monday morning, at shift change, and at 3:00 a.m.
That steady approach leads to results you can measure. In U.S. ICUs, CLABSI rates fell by 58% from 2001 to 2009, and the CDC estimates that 65% to 70% of CLABSIs can be prevented with steady evidence-based maintenance.
The same idea carries across care settings. The standard for bedside safety doesn't change. What changes is how often tasks happen and who handles them in each setting.
Bedside organization helps make that standard easier to follow. When lines stay visible, separated, and off the floor, staff can check them faster and with less guesswork. BeataClasp's Beata Clasp fits into that workflow with antimicrobial, latex-free, easy-to-clean construction for hospitals, ICUs, and home care.
Safer IV line management depends on clear expectations, clean routing, and fast action when line status changes.
FAQs
How often should IV lines be checked?
It depends on where the patient is being treated and how sick they are.
In ICUs, IV lines should be checked hourly. On regular wards, they’re usually checked every 4 to 8 hours.
No matter the setting, care teams should also review lines at shift changes, during spot checks, and as part of a full daily inspection.
Tools like BeataClasp can help keep lines organized and cut down on entanglement, fall, and contamination risks during these routine checks.
When should an IV dressing be changed?
Change gauze dressings every 2 days and transparent dressings every 7 days.
If a dressing gets soiled, damp, or loose, replace it right away. Sticking to this schedule helps keep patients safe and cuts the risk of catheter-related complications in both hospital and home care settings.
What should I do if an IV line will not flush?
Trace the tubing from the fluid bag, through any pumps, all the way to the patient. As you go, look for kinks, loose connections, or anything else that seems off.
Do not force the flush if you feel resistance or notice signs of infiltration, such as swelling, cool skin, or pain. If the resistance does not stop, the lines are unlabeled, or the line placement is unclear, contact your charge nurse or attending physician and follow facility protocols.